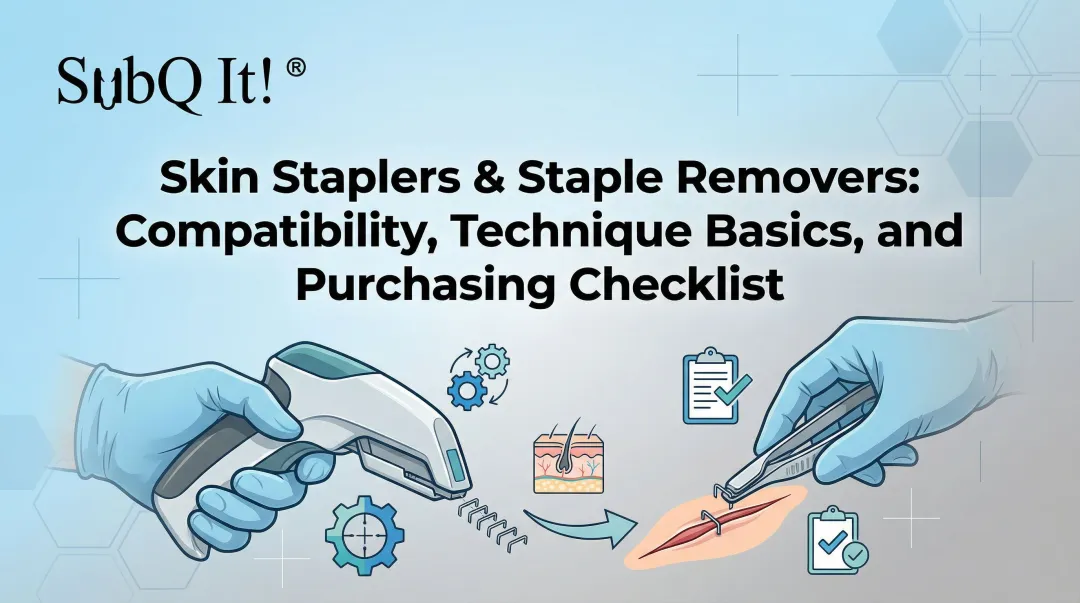
Skin staple removal is a brief yet important step in postoperative care, as it directly affects wound stability, patient comfort, and cosmetic outcomes.
Even small variations in timing or technique can affect how well the incision maintains approximation after removal.
This step is increasingly relevant, given that nearly 12 million wounds are treated annually in U.S. emergency departments, making consistent wound management a routine part of clinical practice.
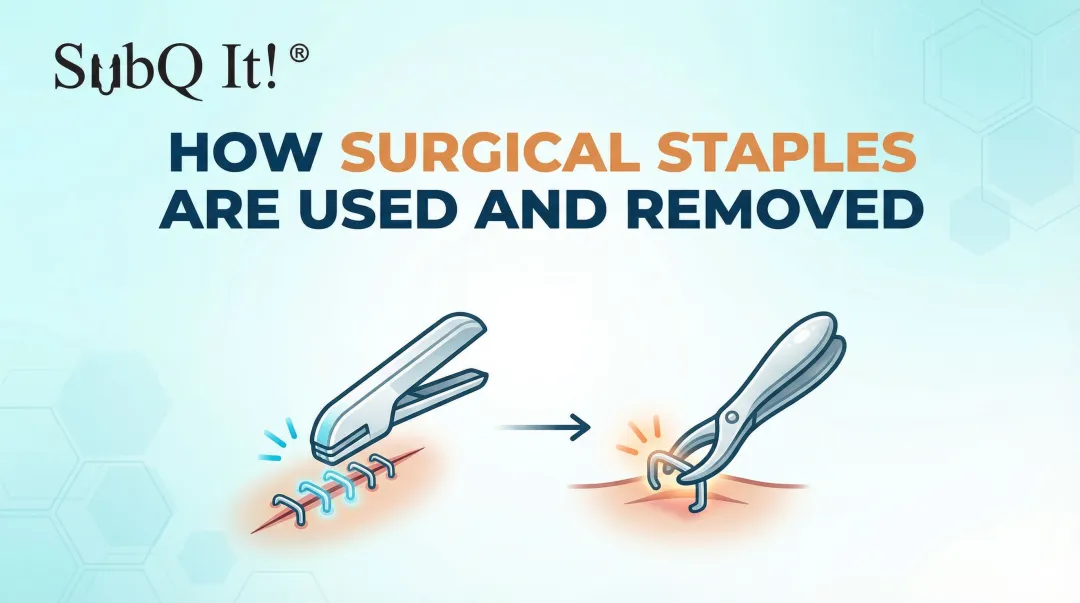
In surgical settings, metal staples are widely used for rapid and reliable closure; however, they require a separate removal phase, which adds to follow-up care and procedural coordination.
In this blog, you’ll examine how skin staple pin removal is performed, including technique, instrument use, and key considerations for safe and controlled extraction.
Key Takeaways:
- Skin staple pin removal requires precise timing and technique, as both directly affect wound stability and healing outcomes.
- Improper removal can lead to complications such as wound dehiscence, tissue trauma, or incomplete extraction.
- Staple removers function by bending the staple centrally, allowing controlled disengagement without pulling through tissue.
- Removal timing varies by anatomical location and patient-specific factors, with high-tension areas often requiring delayed or staged removal.
- Consistent technique and proper assessment help reduce variability in patient experience and post-operative outcomes.
What Is Skin Staple Pin Removal & Why Does It Require Precision?
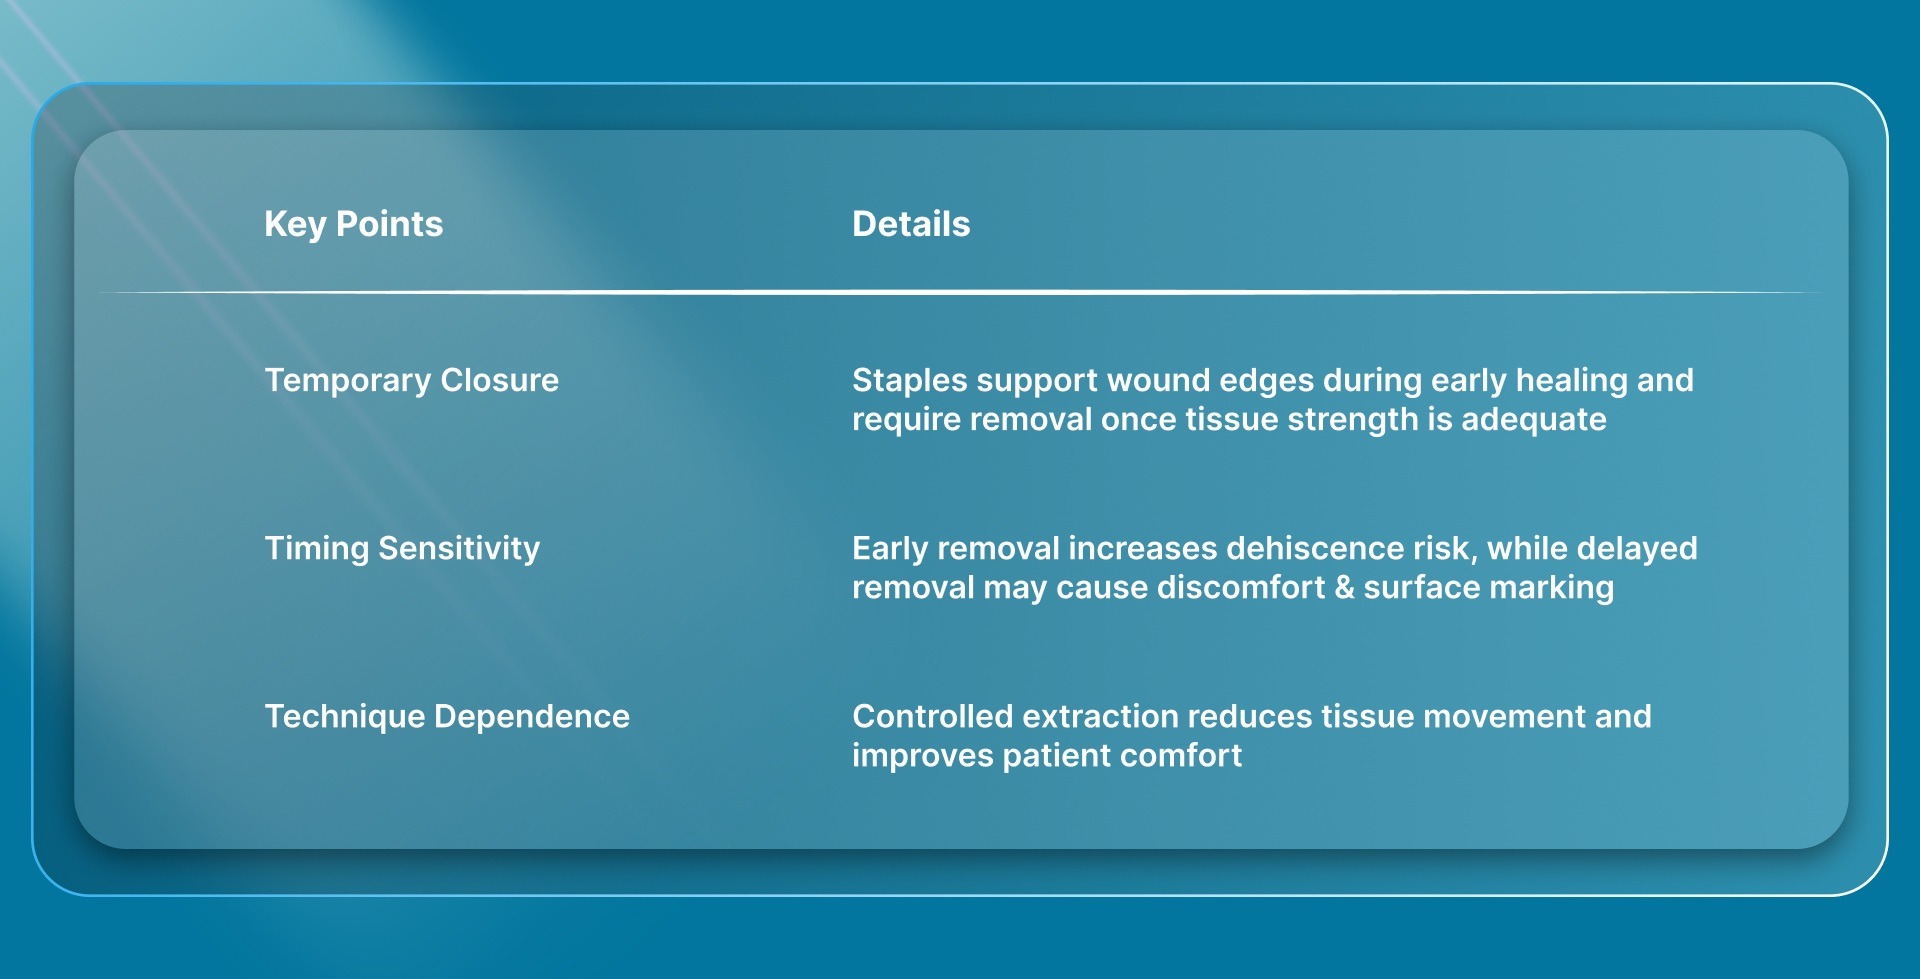
Skin staple pin removal is the clinical process of extracting external metal staples used to close surgical incisions once adequate healing has occurred.
These staples provide temporary mechanical support during early wound healing and must be removed at the appropriate time to allow continued tissue recovery.
The following points clarify why skin staple removal is a critical step in post-operative care.
In response, there is increasing interest in closure approaches that avoid a separate removal step, particularly in longer incisions where the removal burden is higher.
One example is SubQ It! SU-25, which is designed for incisions up to 25 cm and places absorbable fasteners beneath the skin, eliminating the need for removal.
Once the importance of accurate removal is clear, appropriate timing becomes the next clinical consideration.
When Should Skin Staples Be Removed?
The timing of skin staple removal influences whether wound edges remain stable under physiological tension or are at risk of separation. Generally, the staples are removed within 7-14 days.
Below are the following ranges that reflect commonly accepted clinical practice for safe removal.
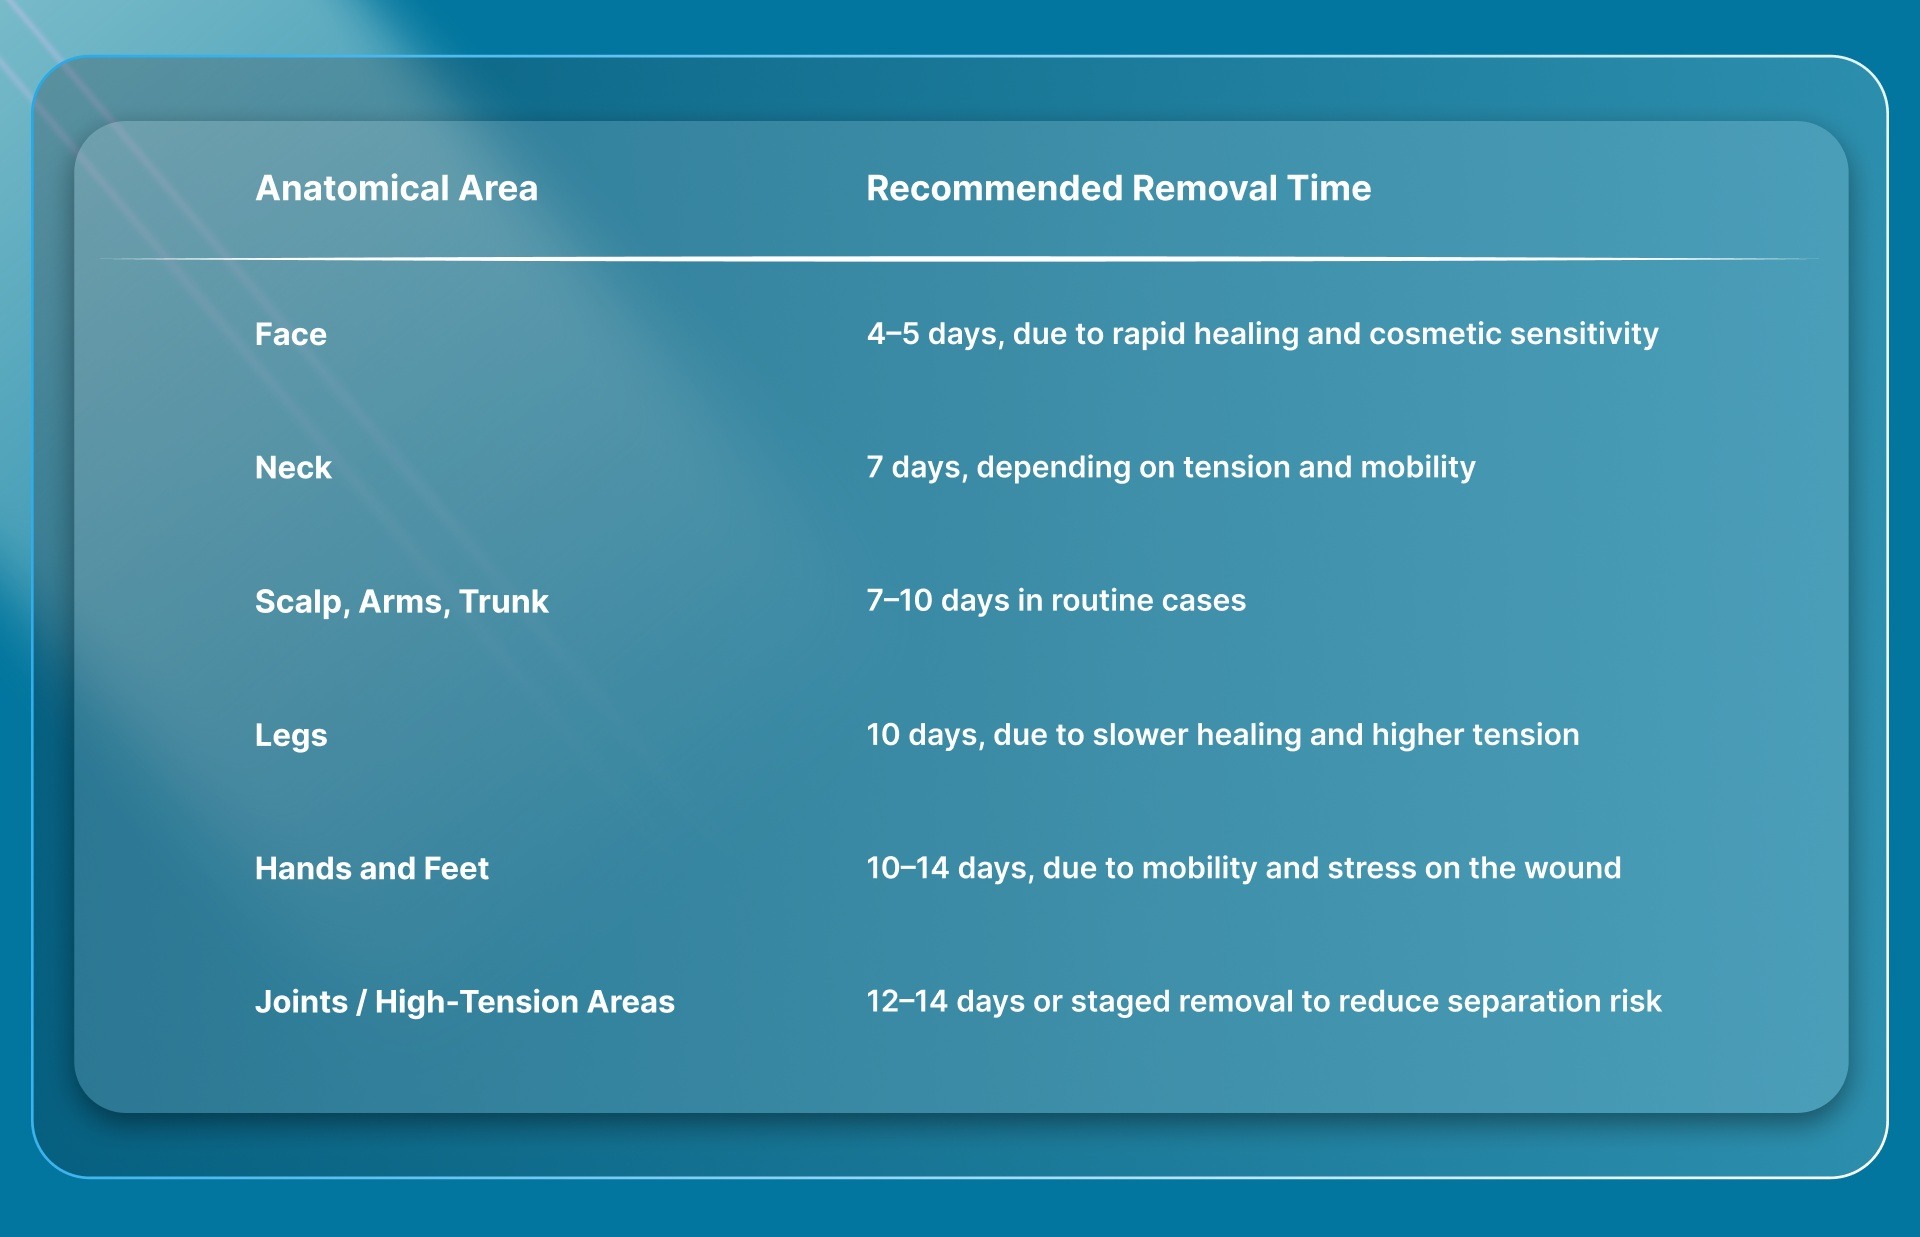
Additional clinical factors that influence timing include:
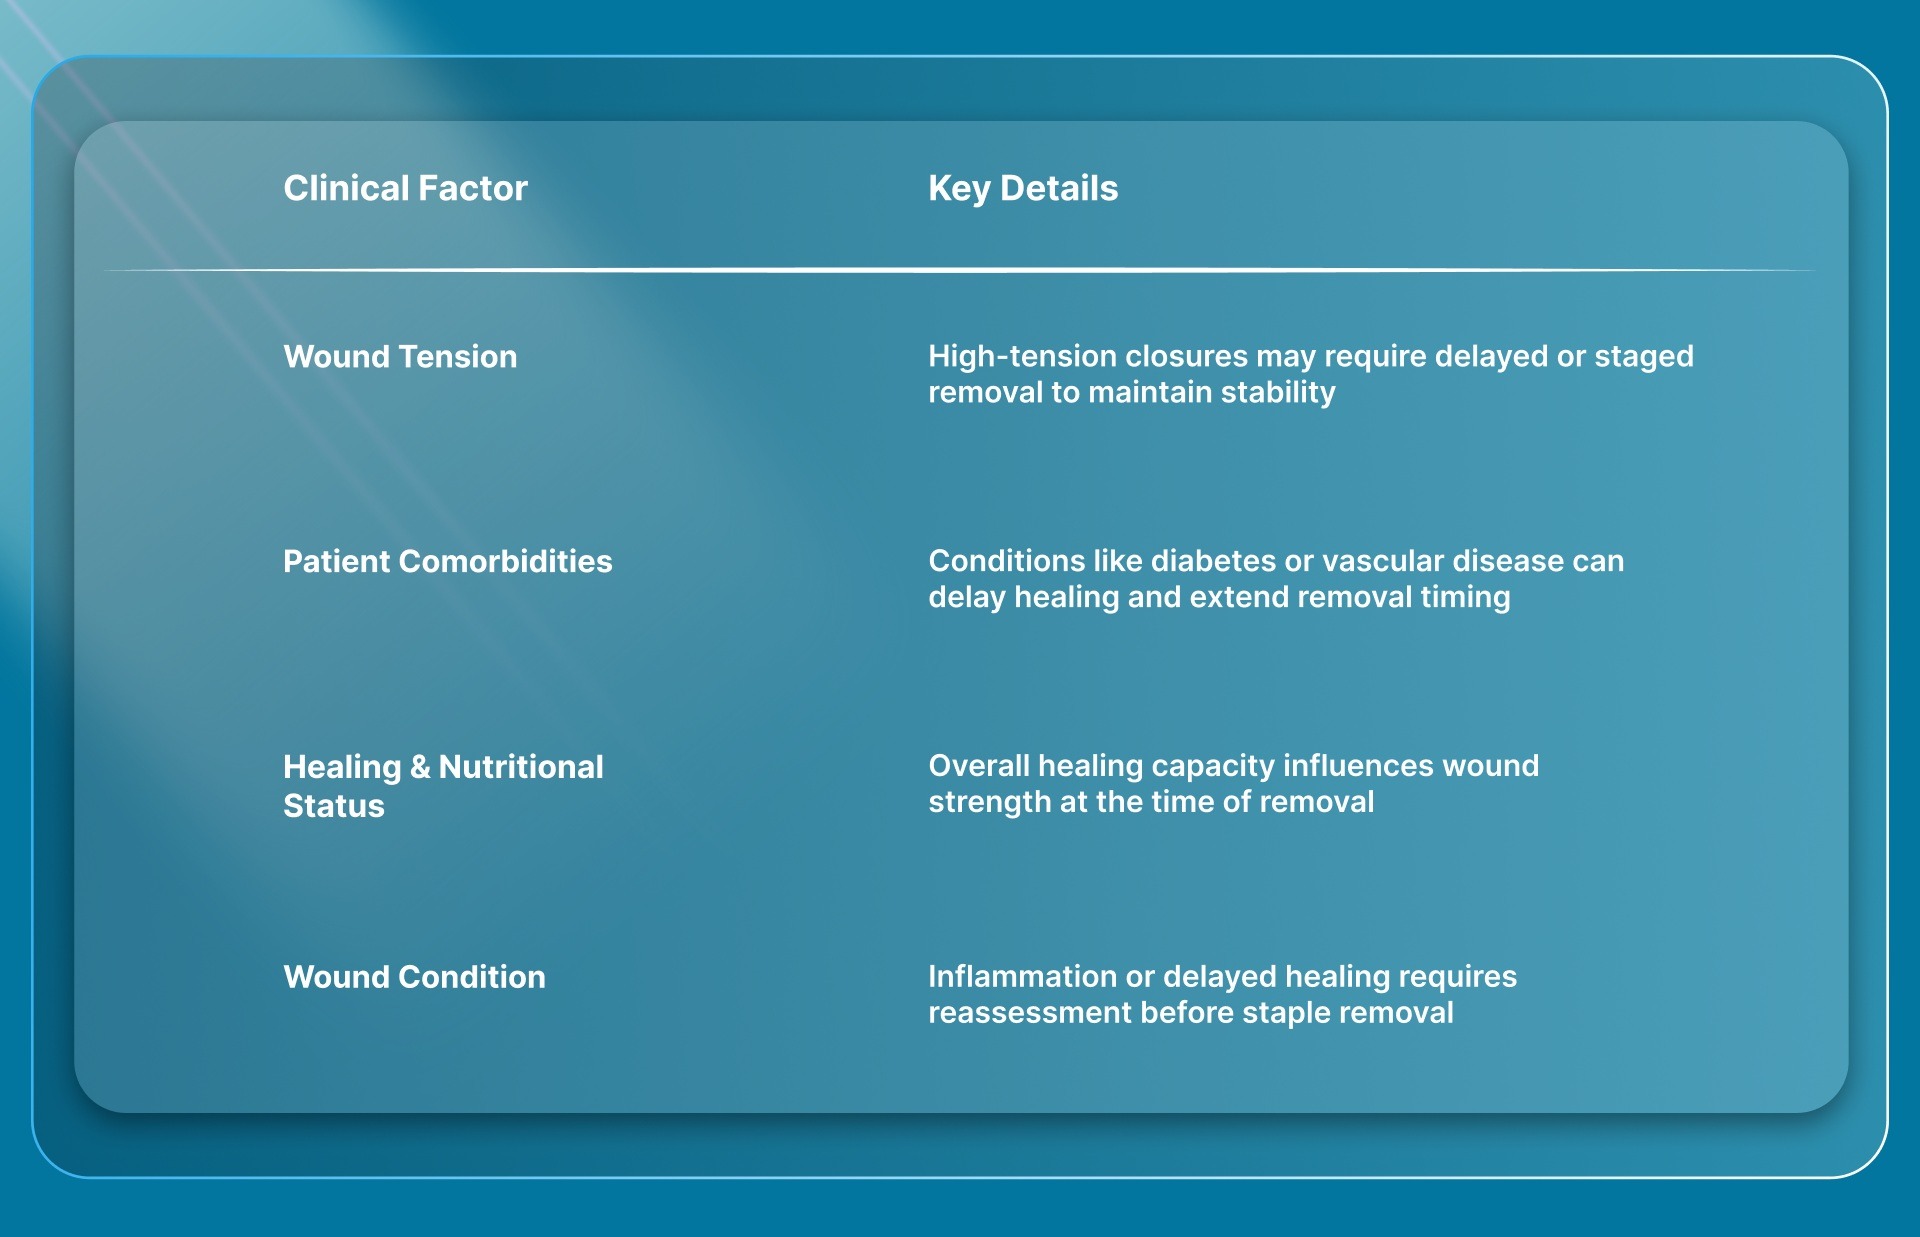
Once you determine the right time for removal, it also requires a careful, step-by-step approach to the procedure itself.
7 Steps for Approaching Skin Staple Pin Removal Technique
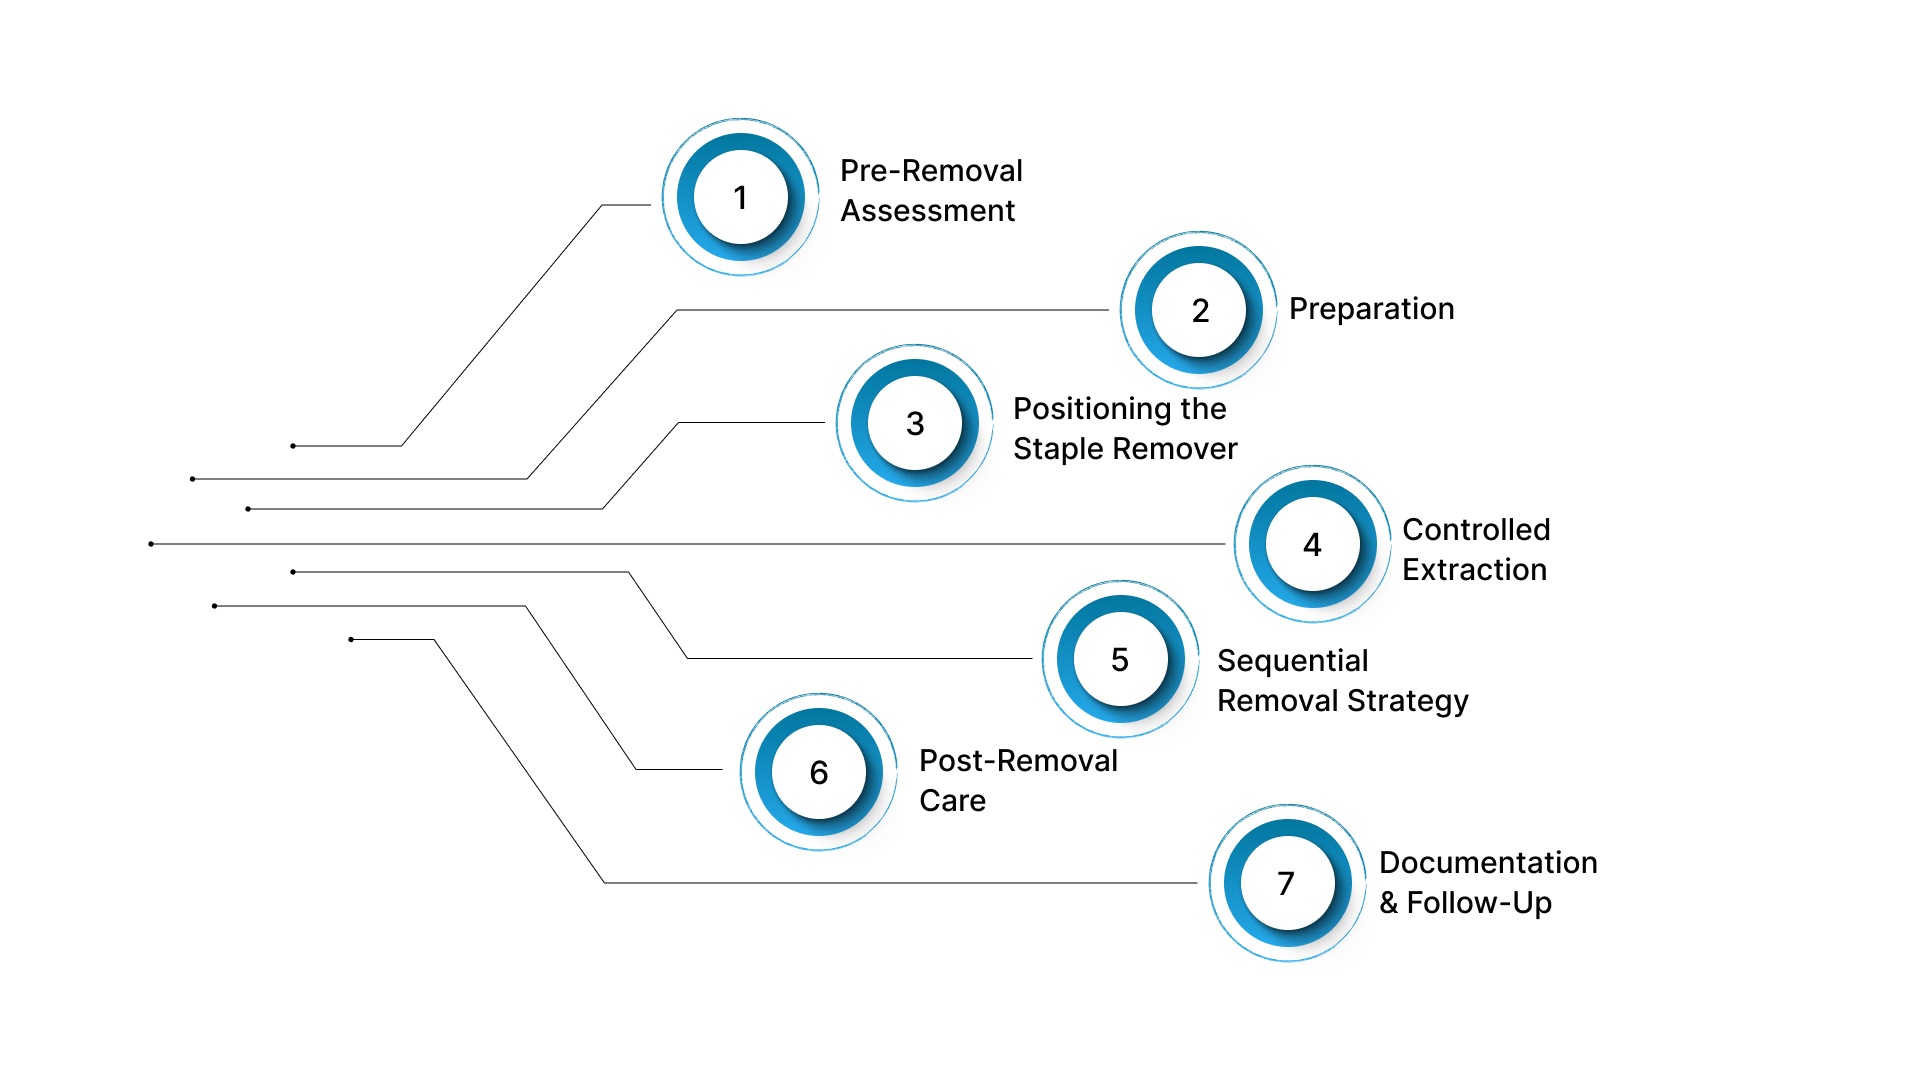
Skin staple pin removal requires correct positioning, steady execution, and careful assessment of wound stability.
Even though the mechanism is simple, variation in technique can affect tissue handling, patient comfort, and the likelihood of incomplete removal.
The following steps outline a standard, clinically accepted approach to the safe and efficient removal of skin staple pins.
1. Pre-Removal Assessment
Before initiating skin staple removal, the wound should be assessed to confirm that it is ready for staple extraction. This helps reduce the risk of dehiscence and avoids complications associated with premature removal.
- Confirm adequate healing: Ensure wound edges are well approximated with no signs of separation.
- Inspect for infection: Look for erythema, discharge, warmth, or local tenderness.
- Assess wound tension: Identify areas where staged removal may be appropriate.
- Review timing: Cross-check removal timing based on anatomical location and patient-specific factors.
2. Preparation
Proper preparation ensures that the procedure is performed under controlled, hygienic conditions. This step supports consistent execution and reduces the risk of contamination.
- Position the patient appropriately: Ensure clear visibility and access to the incision.
- Maintain aseptic technique: Use clean or sterile gloves in accordance with clinical protocols.
- Prepare the wound: Cleanse the area using an appropriate antiseptic solution.
- Use a medical-grade staple remover: Ensure the instrument is sterile or properly disinfected.
3. Positioning the Staple Remover
Accurate positioning of the remover is essential for effective disengagement of the staple from the tissue. Incorrect placement can result in incomplete removal or local tissue pinching.
- Engage the staple crown: Place the lower jaw fully under the staple crown.
- Keep the instrument aligned with the skin: This helps ensure proper engagement during extraction.
- Minimize movement during placement: A steady approach reduces the risk of slippage.
4. Controlled Extraction
Skin staple removal should be performed using steady, controlled pressure. The remover disengages the staple by bending its central portion and allowing the ends to withdraw from the skin.
- Apply steady pressure: Compress the handles smoothly to activate the removal mechanism.
- Allow the staple to open: The device lifts the central portion, enabling the ends to disengage from the tissue.
- Avoid manual pulling: Do not pull upward during removal, as this may increase tissue trauma.
5. Sequential Removal Strategy
In high-tension areas, removing all staples at once may increase the risk of wound separation. A staged approach helps maintain wound stability during removal.
- Remove alternate staples first: This helps preserve wound edge approximation during initial removal.
- Reassess wound stability: Evaluate the incision after partial removal to confirm that edges remain well approximated.
- Complete removal progressively: Proceed with the remaining staples once stability is confirmed.
6. Post-Removal Care
After skin staple removal, the wound should be reassessed to confirm that healing remains stable. Immediate post-removal care helps reduce the risk of complications.
- Check for retained fragments: Inspect each site to ensure all staples have been fully removed.
- Assess wound integrity: Look for any separation of wound edges.
- Cleanse the area if needed: Maintain hygiene following removal.
- Apply closure strips if required: Provide additional support in high-tension areas.
7. Documentation and Follow-Up
Accurate documentation supports continuity of care and helps monitor wound healing progress. Follow-up planning is important when removal is staged or healing is delayed.
- Record staple count: Document the number of staples removed to ensure procedural completeness.
- Document wound condition: Note healing status and any findings during removal.
- Plan follow-up if required: Arrange review in cases of delayed healing or staged removal.
While the technique supports safe removal, understanding possible complications remains essential.
6 Clinical Risks in Skin Staple Pin Removal
Skin staple pin removal is generally a low-risk procedure when performed at the appropriate time and with proper technique. These risks are more relevant in high-tension closures, delayed healing cases, and cosmetically sensitive areas.
1. Wound Dehiscence
Premature removal of skin staple pins may compromise wound strength before adequate tissue healing has occurred. This remains one of the most significant risks associated with incorrect timing.
- Early removal: Removing staples before sufficient tensile strength develops may lead to separation of wound edges under normal stress.
- High-tension sites: Areas such as joints or lower extremities are more prone to dehiscence due to increased mechanical stress.
- Incomplete healing: Wounds that appear closed superficially may still lack deeper structural support at the time of removal.
2. Tissue Trauma During Removal
Improper technique during skin staple removal may result in local tissue injury. This is often related to incorrect positioning or uncontrolled extraction.
- Incorrect tool placement: Inadequate engagement of the staple crown may lead to pinching or tearing of adjacent tissue.
- Excessive force: Applying uneven or forceful pressure may increase local trauma and discomfort.
- Manual pulling: Pulling the staple instead of using the removal mechanism may increase tissue disruption.
3. Retained Staple Fragments
Incomplete removal may occur if the staple does not disengage properly or becomes deformed during extraction. Retained fragments require careful assessment to ensure complete removal.
- Improper engagement: Failure to fully capture the staple crown may result in incomplete extraction.
- Deformed staples: Staples that have shifted or bent may not open correctly during removal.
- Fragment retention: Small retained segments may remain embedded and require further inspection or removal if identified.
4. Patient Discomfort and Pain
Skin staple pin removal may cause transient discomfort, particularly in sensitive or high-tension areas. Pain levels can vary depending on technique and wound condition.
- Poor technique: Inconsistent or repeated attempts at removal may increase discomfort during the procedure.
- Inflamed tissue: Local inflammation may heighten sensitivity at the removal site.
- Multiple staples: Removal of several staples in sequence may lead to cumulative discomfort.
5. Bleeding and Local Irritation
Minor bleeding may occur following staple removal, especially in vascular areas or where healing is incomplete. These effects are typically minor but should be assessed clinically and require observation.
- Superficial bleeding: Small amounts of bleeding may occur as staples are removed from healing tissue.
- Fragile tissue: Delicate or poorly healed tissue may increase the likelihood of minor bleeding or irritation.
- Post-removal sensitivity: Temporary redness or irritation may occur.
6. Infection Risk Considerations
Skin staple removal is considered low risk when performed with appropriate aseptic technique. However, the wound condition at the time of removal remains an important factor.
- Pre-existing infection: Removal in an infected wound may require modified timing or additional care.
- Wound hygiene: Inadequate cleansing before or after removal may increase the risk of infection.
- Aseptic technique: Failure to follow proper technique may contribute to contamination.
These clinical considerations support alternatives designed to eliminate this step entirely.
Best Alternatives That Eliminate Skin Staple Pin Removal
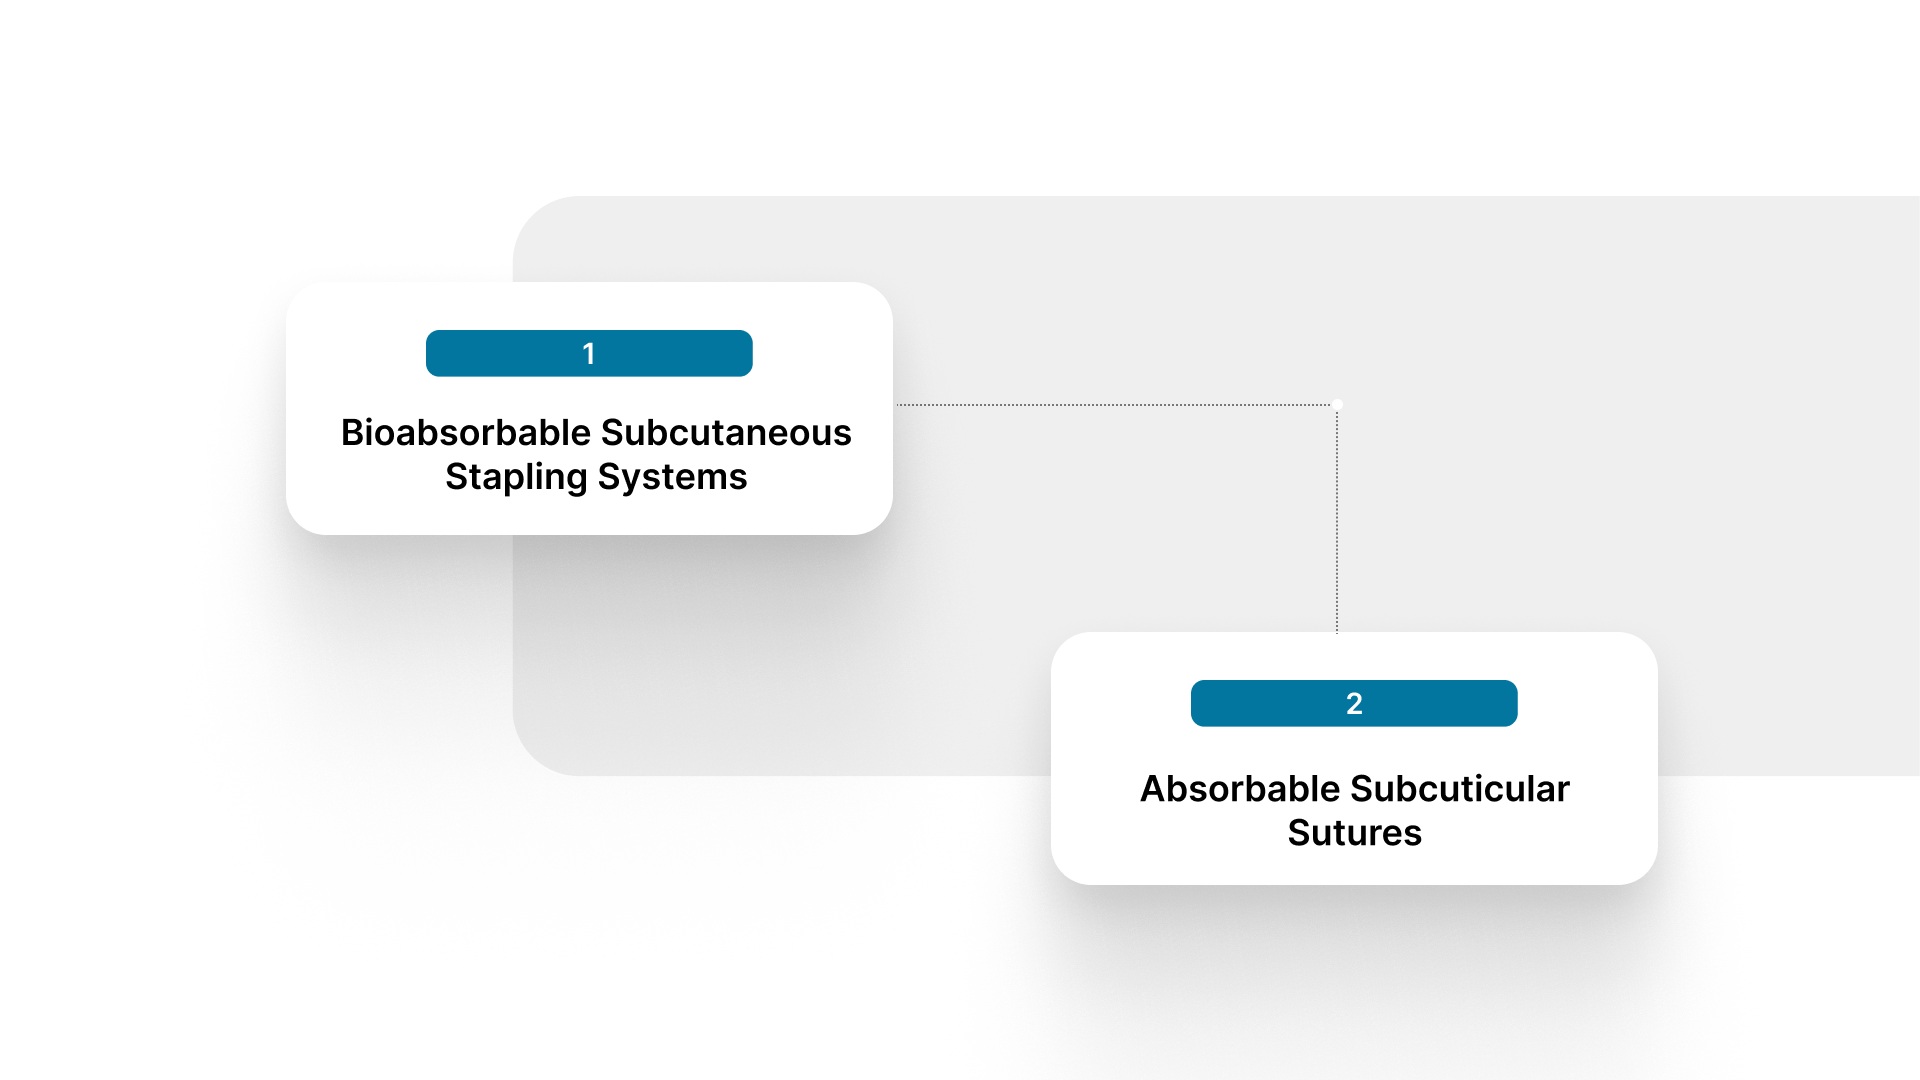 Skin staple pin removal is an additional postoperative step that depends on timing, technique, and coordination of follow-up. While effective when performed correctly, it requires a separate intervention after wound healing.
Alternative closure approaches aim to remove or reduce this step by avoiding the need to remove external hardware.
1. Bioabsorbable Subcutaneous Stapling Systems
Bioabsorbable subcutaneous systems are designed to provide staple-like speed while avoiding removal. These systems place fasteners beneath the skin, where they are gradually absorbed into the body during the healing process.
- No removal procedure required: Fasteners remain below the skin surface and do not need to be extracted.
- Eliminates follow-up for removal: Removes the need for a separate visit dedicated to staple removal.
- May reduce visible surface marking: Avoids external puncture points on the skin surface.
- Maintains procedural efficiency: Allows closure using a consistent, device-driven method.
2. Absorbable Subcuticular Sutures
Absorbable sutures placed within the dermal layer provide wound closure without external hardware. These are widely used in procedures where cosmetic outcome is a priority.
- No external removal needed: Sutures are absorbed over time and do not require extraction.
- Continuous closure technique: Provides even distribution of tension along the incision.
- Familiar technique: Commonly used across multiple surgical specialties.
- More time required for placement: Typically slower compared to stapling methods.
Final Thoughts
Skin staple pin removal does not end with extraction. It continues to influence wound support, follow-up requirements, and the consistency of outcomes across different surgical settings.
As expectations for efficiency and predictable recovery increase, reducing post-operative removal steps becomes important, especially in longer incisions where variability is higher.
In this context, systems like SubQ It! SU-25 offers a device-assisted approach for incisions up to 25 cm in length.
By eliminating the removal step and reducing closure time by approximately 25 minutes per case, the system supports a more consistent closure process.
Contact us today to explore how SubQ It! SU-25 fits into your surgical workflow and supports more efficient closure outcomes.
FAQs
1. When should surgical staples be removed after surgery?
Timing varies by anatomical location, typically ranging from 7 to 14 days. Patient-specific factors such as healing status and comorbidities should also be considered. Removal should be performed once adequate wound stability is confirmed.
2. Does staple removal hurt?
Patients may experience a brief pinching or pulling sensation during removal, which is typically brief, though patient experience may vary depending on wound condition. Discomfort can vary depending on wound condition and tissue sensitivity.
3. Can any staple remover be used on surgical staples?
Non-medical or office staple removers are not intended for surgical use. Medical staple removers are designed to disengage staples in a controlled manner without causing unnecessary tissue trauma. Using inappropriate instruments may increase the risk of incomplete removal or injury.
4. What can go wrong during skin staple pin removal?
Complications may include wound dehiscence, tissue trauma, retained staple fragments, or minor bleeding. These risks are more likely if removal is performed too early or with improper technique. Careful assessment and controlled execution help reduce these risks.
5. Are there alternatives to metal staples that do not require removal?
Absorbable closure methods, including bioabsorbable systems. place fasteners beneath the skin where they are gradually absorbed. These approaches eliminate the need for a removal procedure and may reduce follow-up requirements. Selection depends on wound type, tension, and procedural goals.
6. What factors determine whether skin staple pin removal can be done safely?
Safe removal depends on adequate wound healing, stable edge approximation, and absence of infection or excessive tension. Factors such as wound location, patient comorbidities, and overall healing status should also be considered. Removal may be delayed or staged if stability is uncertain.
7. What are surgical staples made of?
Surgical staples are typically made from medical-grade metals such as stainless steel or titanium, chosen for strength, corrosion resistance, and compatibility with body tissues. In some cases, absorbable staples made from polymer materials are used and gradually break down during healing.
8. How are surgical staples placed?
Surgical staples are applied using a sterile stapling device that aligns wound edges and delivers staples across the incision. When deployed, the staple penetrates the tissue and bends inward to hold the wound edges together during healing.
9. Can patients remove surgical staples at home?
Surgical staples should not be removed outside a clinical setting, as removal requires proper technique and assessment of wound healing. Attempting removal without appropriate tools may increase the risk of wound separation, retained fragments, or tissue injury.