Surgical outcomes hinge on proper skin closure technique, studies show that continuous (including subcuticular closure) sutures are associated with significantly lower rates of superficial wound dehiscence (OR ≈ 0.16) compared to interrupted methods.
While skin closure may appear straightforward, outcomes vary considerably based on suture material selection, technique choice, tissue handling, and execution precision. Even minor technical errors in tension control, edge approximation, or knot security can lead to dehiscence, infection, and suboptimal scarring, ultimately impacting patient satisfaction.
This blog outlines when to use different suturing techniques, step-by-step execution methods, material selection considerations, and common pitfalls to avoid for consistently high-quality outcomes.
TL;DR
- Match suture material (absorbable vs. non-absorbable) and method (interrupted, continuous, subcuticular) to wound characteristics and cosmetic goals
- Proper outcomes hinge on tissue tension control, clean edge approximation, and technique matched to wound location and patient factors
- Most closure failures trace back to wrong material selection, excessive tension, or inadequate knot security — not surgical inexperience
- Bioabsorbable subcuticular closure systems offer stapler-level speed with cosmetic results comparable to hand-sutured subcuticular technique — without staple removal
Step-by-Step Suturing Techniques for Skin Closure
Effective skin closure depends not just on the material used but on the technique selected based on wound characteristics, tension, and cosmetic priorities. Below are the most widely used suturing techniques, along with when and how to apply them in clinical practice.
Simple Interrupted Suture Technique
The fundamental "baseball stitch" method involves piercing skin perpendicularly 4-8mm from the edge, passing through the dermis, exiting the opposite side 4-8mm from the edge, and tying the knot externally to one side.
When to use this technique:
- High-tension wounds requiring individual suture security
- Infected or contaminated wounds where selective suture removal may be necessary
- Situations where wound inspection or drainage is anticipated
- Irregular wound edges requiring precise individual adjustment
The interrupted technique provides superior wound security — failure of one suture doesn't compromise the entire closure.
Running (Continuous) Subcuticular Suture Technique
This technique delivers superior cosmetic outcomes by keeping suture material beneath the skin surface.
Execution steps:
- Anchor at one end with a deep dermal stitch
- Pass horizontally through the dermis, staying 1-2mm below the skin surface
- Alternate sides, advancing 4-8mm per bite
- Maintain consistent depth and spacing throughout
- Finish with a buried knot or pull-out loop
The subcuticular approach eliminates cross-hatching "railroad track" scarring and provides better wound integrity. It's the preferred choice for cosmetically sensitive areas — provided wound tension is already managed with deep dermal sutures.
Vertical Mattress Suture Technique
The "far-far, near-near" method maximizes edge eversion to prevent inversion during healing.
Technique:
- First pass: Enter 4-8mm from the edge, pass through the deep dermis
- Exit opposite side 4-8mm from edge
- Return pass: Enter 1-2mm from the edge through the upper dermis
- Exit 1-2mm from the starting side
- Tie to create both deep and superficial tissue approximation
Ideal scenarios:
- Fragile skin in elderly patients
- Areas requiring eversion to prevent inversion during healing (back, shoulders)
- Wounds under moderate tension
- Situations where deep dermal closure alone provides insufficient eversion
The vertical mattress distributes tension across two tissue planes, reducing the risk of tissue ischemia while promoting proper edge alignment.
Horizontal Mattress Suture Technique
This technique distributes tension laterally along the wound edge rather than perpendicular to it.
Steps:
- Pass through tissue 4-8mm from the edge
- Advance 4-8mm along the wound edge
- Pass back in reverse, creating a rectangular pattern
- Tie gently to avoid tissue strangulation
Watch for: Use bolsters (gauze or plastic tubing) under suture loops to prevent tissue ischemia while maintaining tension distribution. This technique works well for fragile skin and high-tension closures, but marginal necrosis is a real risk if tension isn't carefully controlled.
Deep Dermal (Buried) Suture Technique
The "deep-to-superficial, superficial-to-deep" method reduces tension on skin sutures, allowing focus on cosmetic approximation.
Proper execution:
- Enter the dermis from a deep position
- Exit just below the skin edge
- Mirror the path on the opposite side
- Bury the knot to eliminate a foreign body at the surface
- Space sutures to eliminate dead space and reduce tension
Proper deep dermal closure is critical — it bears the wound's tensile load, allowing skin sutures to simply approximate edges rather than hold the wound together under tension. Without adequate deep dermal support, even well-placed surface sutures will widen as the scar matures.
When to Use Different Suturing Techniques
Wound characteristics, not habit, should drive technique selection. Matching the right approach to the right closure reduces complications and improves outcomes.
Interrupted vs. Continuous Techniques
Use interrupted sutures for:
- High-tension closures requiring maximum security
- Contaminated wounds where infection risk is elevated
- Patients with bleeding disorders
- Situations where selective suture removal may be needed
Use continuous sutures for:
- Speed advantages in long, linear wounds
- Superior cosmesis in low-tension closures
- Subcuticular placement where infection risk is minimal
- Situations where follow-up for removal is certain
Anatomical Considerations
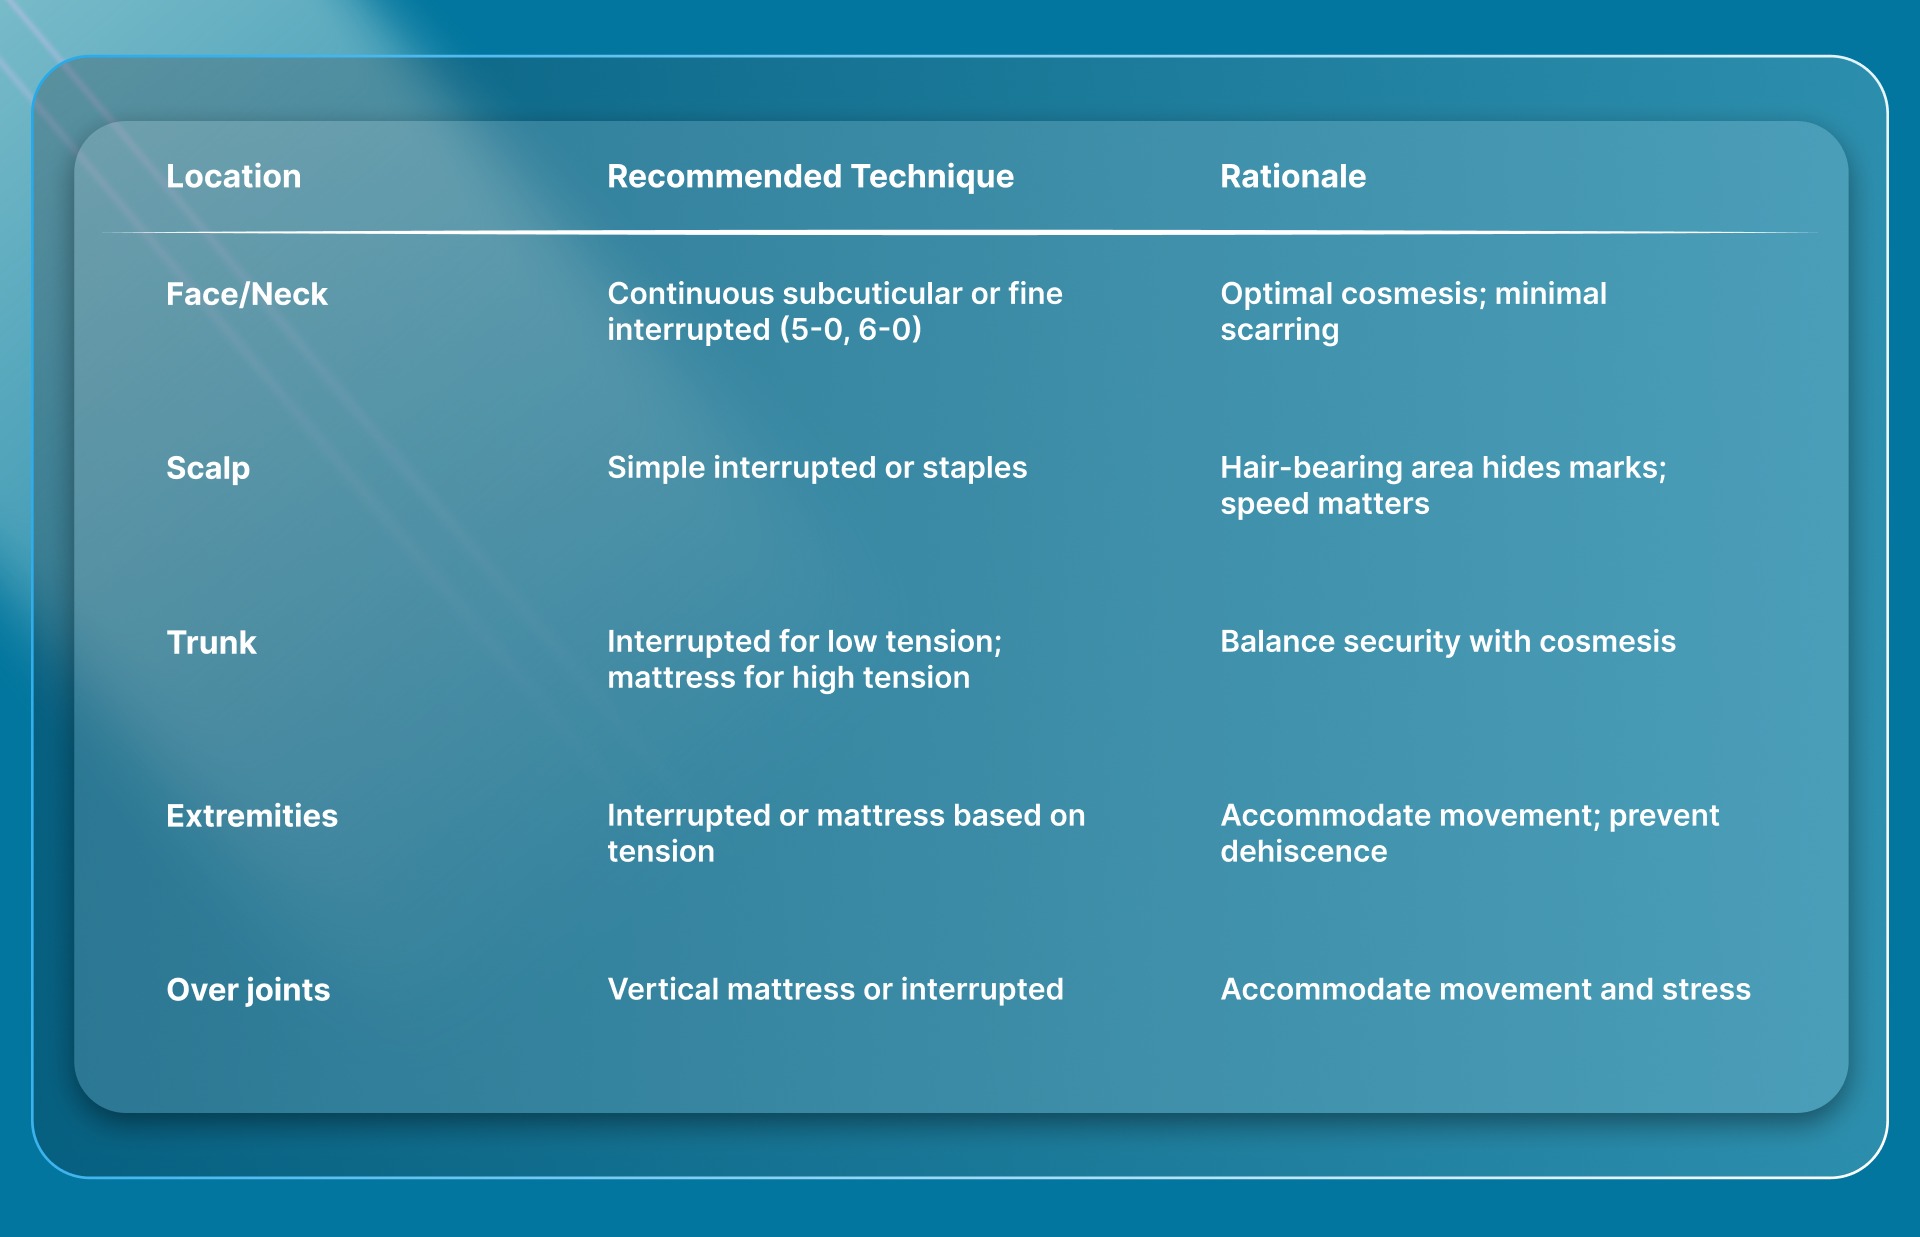
Research on facial closures also highlights that layered closure, addressing tension at the dermal level before skin closure, reduces surface stress regardless of which technique is used at the top layer.
Essential Tools and Preparation for Optimal Skin Closure
Three steps set the foundation before the first suture is placed:
- Irrigate the wound thoroughly to reduce contamination risk
- Achieve complete hemostasis to maintain a clear operative field
- Undermine tissue when necessary to relieve closure tension
Suture Material and Needle Selection
Select suture gauge, needle type, and material based on wound location and anticipated follow-up:
- Gauge: 3-0 to 5-0 for most skin closures
- Needle: Cutting or reverse cutting for skin penetration
- Material: Matched to wound characteristics and patient follow-up availability
Recommended suture size and removal timing by location:
Earlier removal in facial areas minimizes suture track marks, while longer retention in lower extremities accommodates slower healing and higher tension.
With materials selected, the right instruments make precise placement achievable.
Instruments and Workspace Setup
A well-organized sterile field reduces operative time and handling errors. Core instruments include:
- Needle holder (appropriate size for suture gauge)
- Tissue forceps (atraumatic, such as Adson or equivalent)
- Suture scissors with sharp tips
- Adequate lighting for precise tissue visualization
- Sterile field with organized instrument placement
Proper instrument selection matters—using tissue forceps with teeth on fragile facial skin can cause unnecessary trauma, while smooth forceps may slip on thick trunk skin.
Suture Material Selection Guide for Skin Closure
Absorbable vs. Non-Absorbable Sutures
Absorbable sutures (Vicryl, Monocryl, PDS):
- Eliminate removal needs and follow-up visits
- May cause more tissue inflammation
- Ideal for subcuticular placement
- Best when follow-up is uncertain
Non-absorbable sutures (nylon, Prolene, silk):
- Provide the best cosmesis when removed at appropriate intervals
- Require follow-up for removal
- Minimal tissue reactivity
- Superior for percutaneous (through-skin) placement
A meta-analysis of 19 RCTs found no significant difference in cosmetic outcomes between absorbable and non-absorbable sutures when used appropriately. However, non-absorbable materials removed by day 7 typically yield superior cosmetic results for facial closures.
Monofilament vs. Braided Sutures
1. Monofilament sutures (Prolene, Monocryl, nylon):
- Lower infection risk—bacteria adhere less to smooth surfaces
- Glide smoothly through tissue
- Poor knot security requiring additional throws (4-5 vs. 2-3)
- Less tissue drag
2. Braided sutures (silk, Vicryl):
- Excellent handling and knot security
- Higher infection risk due to capillary action
- Greater tissue drag
- Superior tactile feedback
Research demonstrates that monofilament sutures have significantly lower bacterial adherence, making them preferable for contaminated wounds or when infection risk is elevated.
Specific recommendations:
- Use monofilament for contaminated wounds or elevated infection risk
- Use braided for ease of handling in clean wounds
- Always use monofilament for percutaneous skin closure in high-risk patients
Suture Size Selection by Wound Location
Finer sutures minimize track marks but provide less tensile strength.
Selection guide:
- Face and cosmetically sensitive areas: 5-0 or 6-0 monofilament
- Neck: 4-0 to 5-0
- Trunk and extremities: 3-0 to 4-0
- High-tension areas or thick skin: 2-0 to 3-0
- Subcuticular closure: 3-0 to 4-0 absorbable monofilament
Finer sutures create smaller needle holes and less tissue trauma — but at the cost of tensile strength. Match the size to both cosmetic goals and wound tension demands.
Special Considerations for Vicryl and Other Common Materials
Vicryl (polyglactin 910):
- Braided absorbable suture
- Best used for subcuticular or deep dermal layers
- Not ideal for percutaneous skin closure due to inflammation risk
- Absorption time: 56-70 days
- Moderate tissue reactivity
Compared to alternatives:
- Monocryl: Faster absorption (91-119 days), less inflammation, better for subcuticular skin closure
- PDS: Longer strength retention (182-238 days), better for fascia, less ideal for skin due to stiffness
When selecting among these three for skin specifically, the choice comes down to absorption timing and how much reactivity the wound bed can tolerate, which the rankings below address directly.
Best Absorbable Sutures for Skin Applications
Ranked by application:
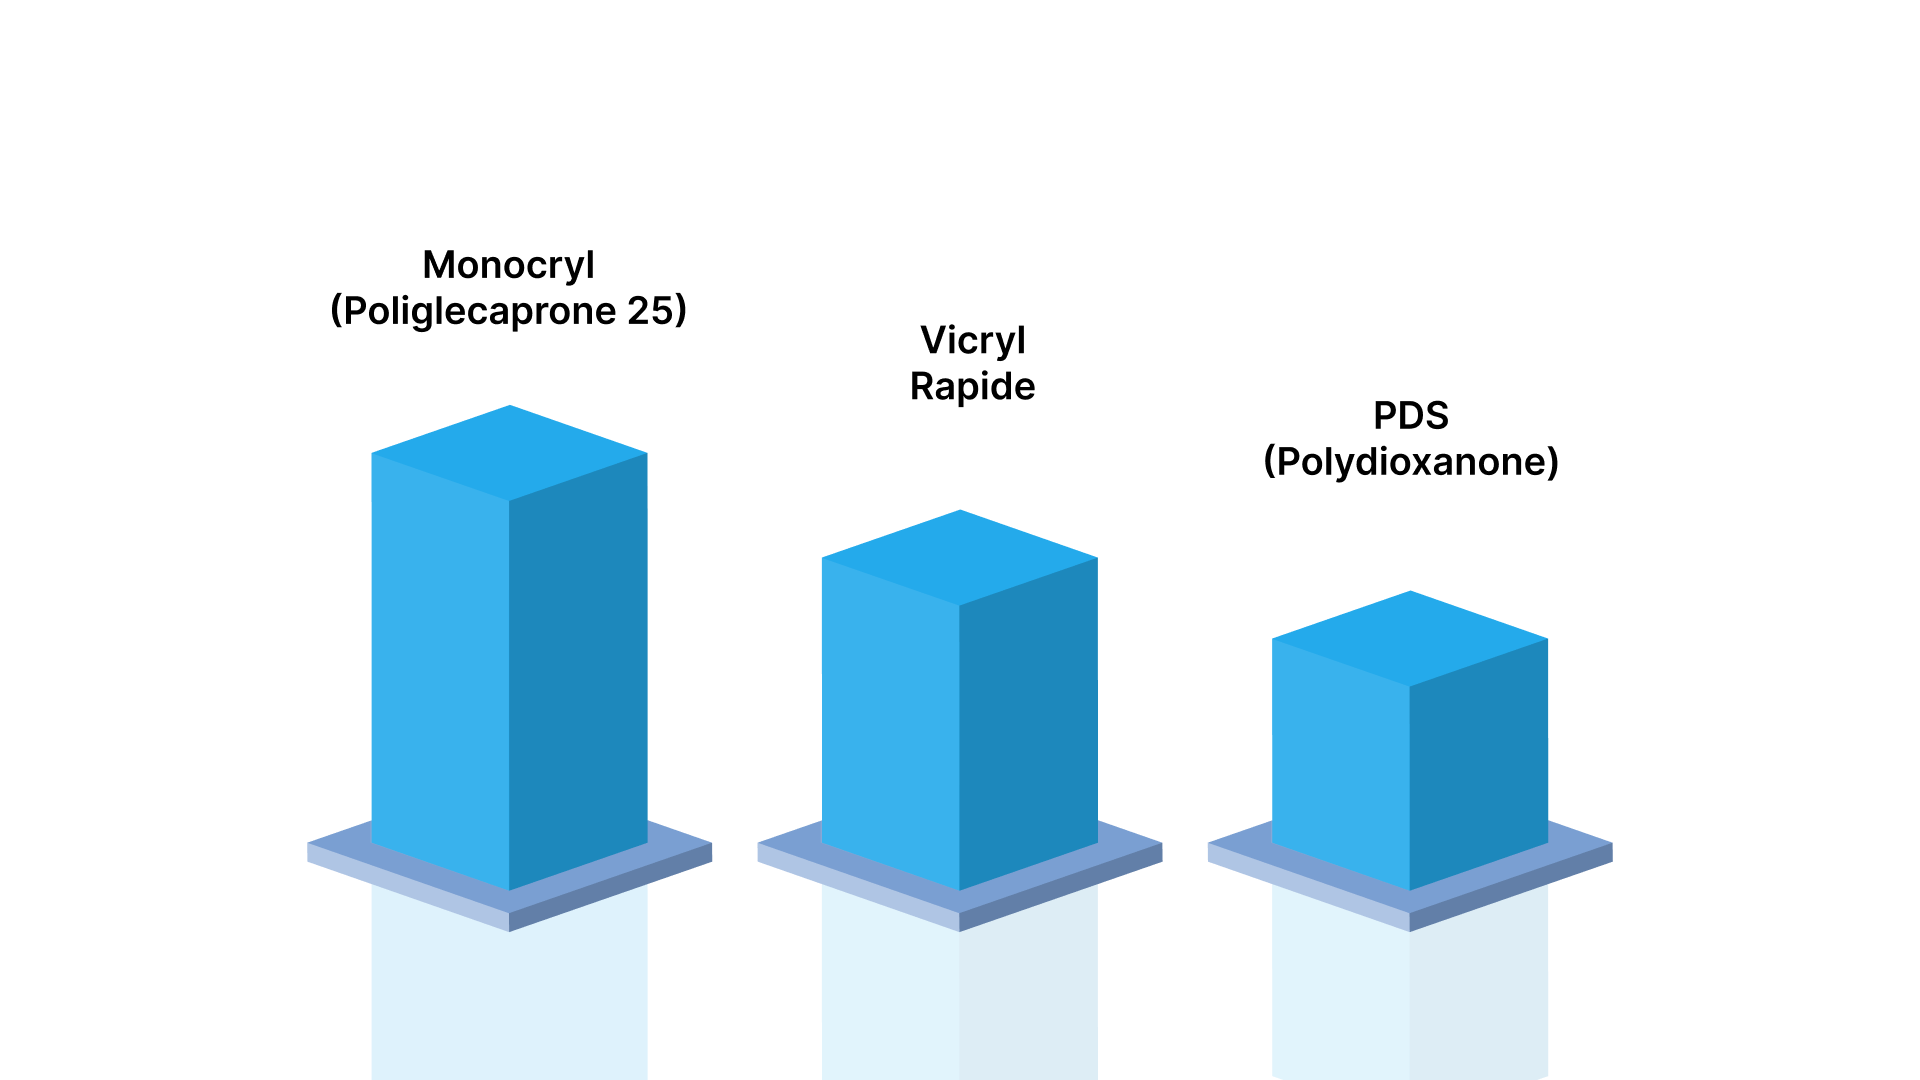
1. Monocryl (poliglecaprone 25) - Best for subcuticular closure in most cases
- Low tissue reactivity
- Good handling characteristics
- Minimal inflammation
2. Vicryl Rapide - Acceptable for pediatric or facial wounds requiring early absorption
- Falls off in 7-10 days
- ~42-day absorption reduces the removal burden in children
3. PDS (polydioxanone) - Best when extended strength is needed
- Longest strength retention among absorbables
- Too stiff for most skin applications
- Better suited for fascia
WHO guidelines recommend triclosan-coated versions of these sutures to reduce surgical site infection risk by approximately 25%.
Common Mistakes in Skin Closure and How to Avoid Them
Excessive Tissue Tension and Strangulation
Overtightening sutures causes tissue ischemia, necrosis, and increased scarring. The principle: approximate, don't strangulate.
How to avoid:
- Tie sutures just tight enough to approximate edges without blanching
- If tissue wrinkles or puckers around sutures, they're too tight — remove and replace immediately
- Use deep dermal sutures to bear tension, allowing skin sutures to approximate gently
Troubleshooting tip: The skin edges should touch but not overlap or indent. Any visible blanching means you've overtightened.
Improper Suture Spacing and Depth
Irregular spacing creates uneven tension distribution and gaps that risk dehiscence.
How to avoid:
- Maintain consistent 4-8mm spacing for interrupted sutures
- Enter and exit at equal depths on both wound edges
- Asymmetric bites cause one edge to override the other
- This creates a visible ridge that worsens cosmetic outcomes
Asymmetric depth is also one of the easiest errors to prevent — check bite symmetry before tying each knot.
Poor Knot Security and Placement
Common knot failures:
- Granny knots (both throws in the same direction) slip under tension
- Insufficient throws for slippery materials (Prolene requires 4-5 throws vs. 2-3 for silk)
- Knots placed directly over wound edges that irritate and increase scarring
How to avoid:
- Use a surgeon's knot (double first throw) for initial security
- Place knots to one side of the wound
- Verify square knot configuration (throws in opposite directions)
- Polyglactin 910 requires adequate throws to prevent slippage
Inadequate Deep Layer Closure Before Skin Approximation
Attempting to close skin under tension without proper deep dermal/subcutaneous layer closure leads to dehiscence, wide scars, and poor cosmesis.
Critical principle: Always close dead space and reduce tension with buried sutures before placing skin sutures.
Proper sequence:
- Close deep layers (fascia, subcutaneous tissue)
- Place deep dermal sutures to eliminate tension
- Approximate skin edges with minimal tension
- Focus on precise edge alignment and eversion
Troubleshooting Skin Closure Complication
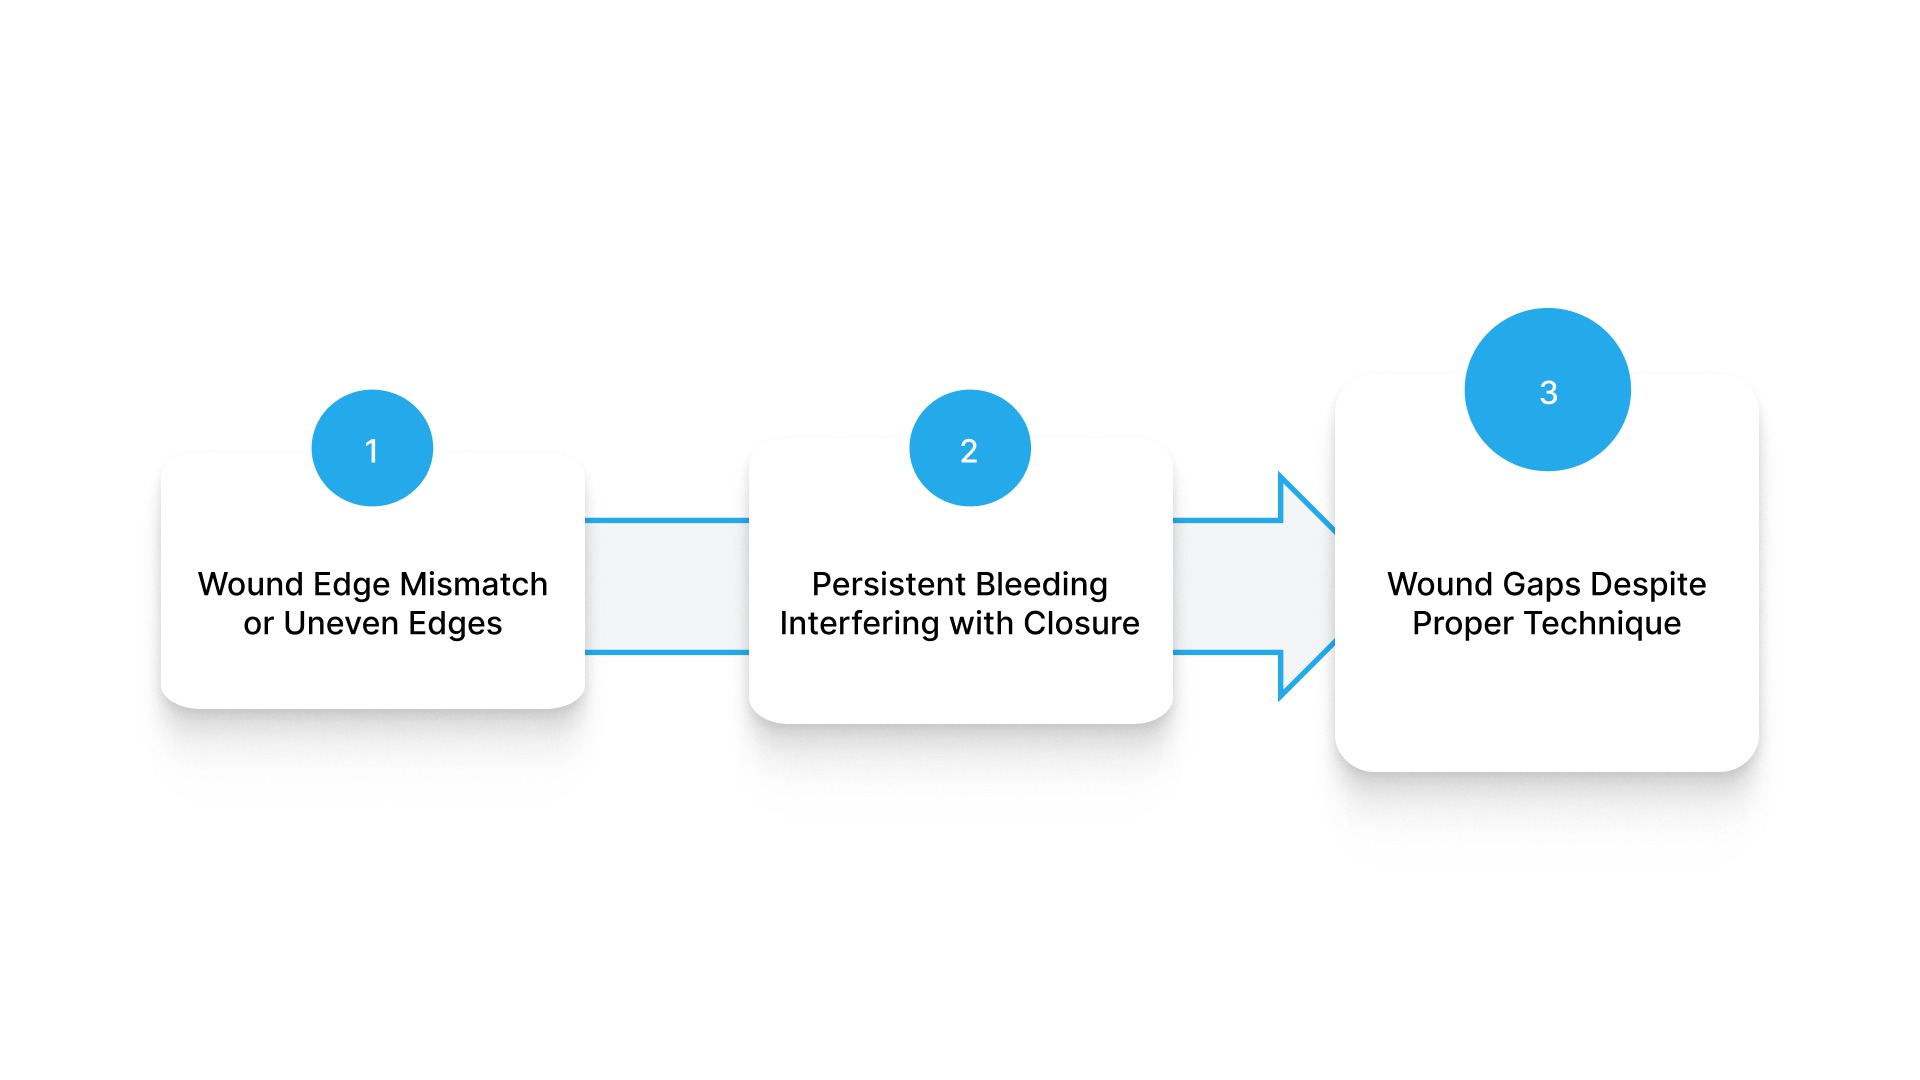
Even with sound technique, certain complications arise predictably. Recognizing the root cause early determines whether a simple adjustment resolves the problem or a more significant revision is needed.
Wound Edge Mismatch or Uneven Edges
Uneven edges usually trace back to three causes:
- Asymmetric undermining
- Unequal tissue excision
- Different tissue thickness on opposing sides
To correct this, use vertical mattress sutures to level mismatched edges, and adjust entry/exit points to compensate for thickness differences. Additional undermining on the thicker side often restores balance. If tissue planes are misaligned deeper in the wound, deep dermal sutures are the most reliable fix.
Persistent Bleeding Interfering with Closure
Bleeding that complicates closure typically originates from inadequate dermal hemostasis, needle-track trauma, or an underlying coagulopathy. Before attempting closure, achieve meticulous hemostasis using electrocautery or ligatures. For discrete bleeding points, figure-of-eight sutures provide targeted control.
If bleeding seems disproportionate:
- Evaluate the patient's coagulation status
- Consider temporary pressure packing before final closure
- Rule out anticoagulant use that may require dose adjustment or reversal
Wound Gaps Despite Proper Technique
Persistent gaps after closure indicate residual tension — most often from insufficient deep-layer closure or inadequate undermining. Place additional deep dermal sutures first to offload the surface. If tissue mobility allows, further undermining can provide the slack needed for tension-free apposition.
When primary closure still creates excessive tension, consider:
- Healing by secondary intention
- Delayed primary closure
- Flap or graft reconstruction
Never force a closure under excessive tension. The outcome will be worse than a planned alternative approach.
Modern Alternatives to Traditional Suturing Methods
While traditional suturing remains the gold standard for most closures, modern alternatives offer advantages in specific clinical scenarios.
Surgical Staples
Appropriate uses:
- Rapid closure of long, linear, low-tension wounds
- Trunk or scalp, where cosmesis is less critical
- Trauma situations requiring speed
- Lengthy procedures where time savings matter
Key trade-offs:
- Significantly faster application (important in trauma)
- Creates "train track" scarring
- Requires removal, causing patient discomfort
- Inferior cosmetic outcomes compared to sutures
Research shows similar infection rates between staples and sutures, but cosmetic outcomes favor sutures when removed at appropriate intervals.
Tissue Adhesives and Skin Glue
Best applications:
- Superficial lacerations under minimal tension
- Pediatric patients where suture removal is challenging
- Adjunct to deep sutures for final skin approximation
- Low-tension facial wounds
Limitations:
- Inadequate strength for high-tension wounds
- Cannot be used on mucosal surfaces or hairy areas
- Risk of dehiscence if wound edges are not properly approximated before application
- Not suitable for wounds with active bleeding
Meta-analyses demonstrate that tissue adhesives provide cosmetic outcomes comparable to sutures for appropriate facial and neck wounds, with similar infection rates and faster application.
For procedures where both speed and cosmesis matter, and neither staples nor adhesives fully deliver, bioabsorbable subcuticular fastener systems offer a third path.
Bioabsorbable Subcuticular Fastener Systems
SubQ It! combines the speed of a stapler with cosmetic results comparable to subcuticular sutures, closing incisions roughly 7x faster than manual suturing.
- Bioabsorbable dermal fasteners placed subcutaneously (beneath the skin surface)
- External skin is never pierced
- Fasteners absorbed by the body after healing
- No removal required
These systems are particularly well-suited for:
- Closing small and laparoscopic incisions
- Procedures where faster closure reduces anesthesia time and costs
- Patients where staple removal follow-up is difficult to ensure
- Cases where eliminating percutaneous metal staples reduces discomfort and improves cosmesis

SubQ It! holds FDA 510(k) clearance (K131563) for abdominal, thoracic, gynecologic, orthopedic, plastic, and reconstructive surgery. Each fastener deploys in approximately 7 seconds versus 42 seconds per subcuticular stitch — a difference that adds up quickly across longer incisions.
Explore how SubQ It! fits into your surgical workflow and get in touch with the team to learn more.
Frequently Asked Questions
Q. What suture is best for skin laceration?
The best suture depends on laceration characteristics. For face and areas requiring optimal cosmesis, use 5-0 or 6-0 monofilament non-absorbable (nylon or Prolene) with removal at 3-7 days. For trunk and extremities, use 3-0 or 4-0 non-absorbable with removal at 10-14 days. For subcuticular closure, use absorbable monofilament like Monocryl or PDS.
Q. What sutures are used for skin closure?
Skin closure typically uses either non-absorbable sutures (nylon, Prolene, silk) that require removal, or absorbable sutures (Monocryl, Vicryl, PDS) that dissolve over time. Selection depends on whether the subcuticular or the percutaneous technique is used and whether follow-up for removal is feasible.
Q. Can absorbable sutures be used on skin?
Yes, absorbable sutures can be used on skin, but work best in subcuticular rather than percutaneous placement. Percutaneous absorbable sutures may cause more inflammation and leave residual material after partial absorption compared to removed non-absorbable sutures.
Q. What are the best absorbable sutures for skin?
Monocryl is generally best for subcuticular skin closure due to low tissue reactivity, appropriate absorption timing (91-119 days), and good handling. PDS offers longer strength retention for areas needing extended support. Vicryl Rapide works for pediatric cases requiring faster absorption (absorbs within 7-10 days).
Q. Is Vicryl used for skin closure?
Vicryl is commonly used for skin closure, but primarily in subcuticular or deep dermal layers rather than percutaneous placement. It provides good strength and handling but causes more tissue inflammation than Monocryl and takes longer to absorb (56-70 days), making Monocryl the preferred choice for subcuticular closure.